Thursday, September 1, 2022

Dreadfully Delusional Dolls - Ms. Marwood


Ms. Eunice Amelia Marwood


Loves to walk under the darkness of New Moons.
Lives off Veuve Clicquot, cavier and cigarrettes.

Collects antique surgical sets and "Do Not Disturb" signs.
Can't stand children, refers to them as "Semen Demons".
Constantly quotes Anaïs Nin.

.


Wednesday, August 31, 2022

Dreadfully Delusional Dolls - Of Time Past


These lovely Ladies, Harpies and Sin Eaters were from Halloween 2021. Alas! 

They all have  homes but 2022's batch of Dreadful Dolls will be out soon.


Yes Bitches, I know.


It's been a good fucking while since I've posted anything.

Tuesday, February 2, 2021

Gelli Plate Postcard


 Gelli Plate postcard. (Citrasolv paper is just a background I laid the postcard on for photo.)


Dresden scraps, Poe quote and fairy from Alpha Stamps

Monday, February 1, 2021

Tiny Dilapidated House


Here we have a tiny 1 inch dilapidated house that was originally going to be just a well, tiny house in part of a Valentine's Day decoration. Obviously as you can see it didn't go as planned.

Since there were issues popping the window frames out, I decided to work with the mess I made out of them instead of just throwing the entire house away in frustration. 


To make this house:

  • Glue house together.
  • Try your damndest to pull the window frames out of the cardboard they come on without ruining them. 
  • Glue window frames onto the house in all the appropriate places.
  • Slap some paint on the house, perfection is not needed for the dilapidation look.
  • Glue a small piece of fabric in the round window above the front door.

Now it's just a dilapidated little house, perfect for storing memories that are best left alone...in the dark. 


You can get the tiny house from Alpha Stamps HERE


Sunday, November 29, 2020

Mid-Century Themed Ornaments


 Retro Ornaments!!


How cute are these retro ornaments? I love Mid-Century Christmas images and Alpha Stamps never disappoints! 

I was lucky to get a miniature red-flocked tree from Wally World before they sold out and think the retro look goes pretty well with it! Also cleaned out 2 local Target stores for the retro-styled flocked deers, as well as the tiny ceramic deers they had. (Sorry Roswell peeps, I'm selfish that way!)

Here's the flip side of the ones in the top photo.


Both the Hello Christmas Kit and the December Kit were used for this project. The Wood Christmas Ornament Back is the perfect base for these quick and simple ornaments. There is not a whole lot of technique in making these, basically if you can cut, glue and use glitter, you're all set! Speaking of glitter, I relied a lot on Stickles, old-fashioned glitter picked up for about $3 (ok cheap clear glitter) but I really love the look of it. I used the cheap glitter on these two ornaments:


It's hard to see in the above photo but I used the clear glitter on the main image, as well as on the Snowflake Doily edges. The edges and top of each ornament is edged with Stickles Mercury Glass. It took about 3 coats to get it where I wanted it - the worse thing about Stickles is waiting for it to dry. If you layer it, it seems to go faster and hitting it with the heat gun helps as well. To make sure it's really dry make sure to let it dry overnight.

One thing I love about glitter - it can fix just about any mistake! The skiing snowman is accented with Stickles and Microbeads. Again with the Snowflake Doily I used the cheap glitter and extended it to the edges of the snowflake.


Equally hard to photograph is the Rock Candy Stickles that I used on the snowman. Really what it did was give it a bunch of texture. As you can see I was impatient and hung the ornament on the tree, and some of the red flocking got into the Stickles.


Santa Cat is one of my favorite images! The background glitter used is the Winter Snow Glitter Mix that is a custom mix of glitter, micro beads and Diamond Dust with just a tinge of light blue. Very sparkly!


More ornaments:


This ornament uses the German Fir Tree that has a flat back. Perfect to slather Stickles on, and then adding the Hello Christmas Polymer Clay Slices Mix as ornaments. Tweezers will make your life easier when adding the tiny pieces.


Supply List

Wednesday, October 21, 2020

Halloween Dance Party


Halloween Dance Party!

I had loads of fun making the Halloween Dance Party for Alpha Stamps using the Witches Dressing Table And the Halloween Market Kits.  Today I will be focusing on how to make the pumpkin head dolls. (Since I'm so obsessed with making them now!)


(The pumpkin head dolls kill me!)


The pumpkin head dolls actually happened on a whim, I just kept seeing faces on the pumpkins when I first saw them, the pumpkins are a nice size and the foam is easy to draw on (with a felt-tip pen). So of course they'd need bodies too, amiright??

Let's get started on the dolls!


To make these you really need a heavier gauge wire than what I had on hand. I used a 24 gauge wire and really, 18 or 20 would have been better choices. Not to mention being a lot easier to wrap with paper too Than the super skinny wire I used!


Take a length of wire about *this* long (you all know I don't measure things!) You'll want it longer than the desired size, and you can always cut it if it's ends up being too long. Fold the wire in half, wrap it around itself leaving a loop at the top. At the bottom of each leg loop it, then wrap leftover wire around each leg.

Take a shorter length of wire, create a loop on one side and wrap it around itself. Do the same with the other side, then wrap that entire piece around the "body". 

An alternative is to make the body out of one piece of wire, which I find to be easier for me and it would look like this when finished (or close to it):


When I made these I didn't know that I'd be doing a tutorial for them so I don't have any pictures of actually putting the paper and tape onto the wire. 

You'll need newspaper or thin kraft paper torn into small strips. Once they're torn, then crumble them up. My dolls were wrapped from the neck down, glue down each strip when you come to the end of it.

Once the wire is all wrapped, then you can keep wrapping to get the desired thickness. I wanted the dolls to have bellies, so I wadded up a strips and glued them down to the belly area. Once it was plump enough, and the arms and legs were done then it's time to wrap the body with masking tape. I didn't wrap the legs but you could if you wanted to.

The masking tape I had was too wide, so I just tore thinner pieces of it to use. 

Here are my dolls once they were done being wrapped and glued the pumpkins onto the head loop.


Note: Make sure to wrap the arms and feet all the way down. When I made these I didn't, and it's just easier to do it all at once.


Once your doll is made, then use a felt tip marker to draw on the faces onto the pumpkins. The pumpkins are really lightweight foam and a pencil or regular pen would leave indentations. A white opaque pen was used to draw on the teeth.

To dress the boy pumpkin I wrapped seam binding around the top of the body for his shirt, and then wrapped sari silk ribbon around the bottom and legs for his pants. The bottom of the "feet" are bent so when they're painted it looks like he is wearing shoes.

The girl pumpkin's outfit is basically painting her entire body black, except for her hands, so that it looks like she's wearing a body suit. The white opaque pen was used to draw on the stripes onto her legs.

The bow on her head is made from seam binding, and her skirt are 2 flower petals from a The Dollar Tree fake flower. Pull the flower off of the stem, remove whatever is holding it together and the petals will come apart. Make a couple of tiny slits in the middle of the petals, and it should slip right onto the doll. More than likely the petals will be too long so just snip them up a bit.


When trying to take pictures of the finished piece, her shoes just faded into the background. To fix that I used Rose Gold Stickles to make them pop out a bit.


For the other supplies that I used to create the Halloween Dance Party (and the must have pumpkins!) please click: 


Saturday, September 19, 2020

Little Heart Shrine


 Little Heart Shrine (or Mary thinks WTF)


This literally was a quick, last-minute project that I did the other night so I did not take any technique photos. I had been trying to organize my studio and found another Little Niche Heart Shrine. Sitting on my work table was the Celestial Spheres and Shrine Icons Collage Sheets and I thought "ooooh how perfect!"


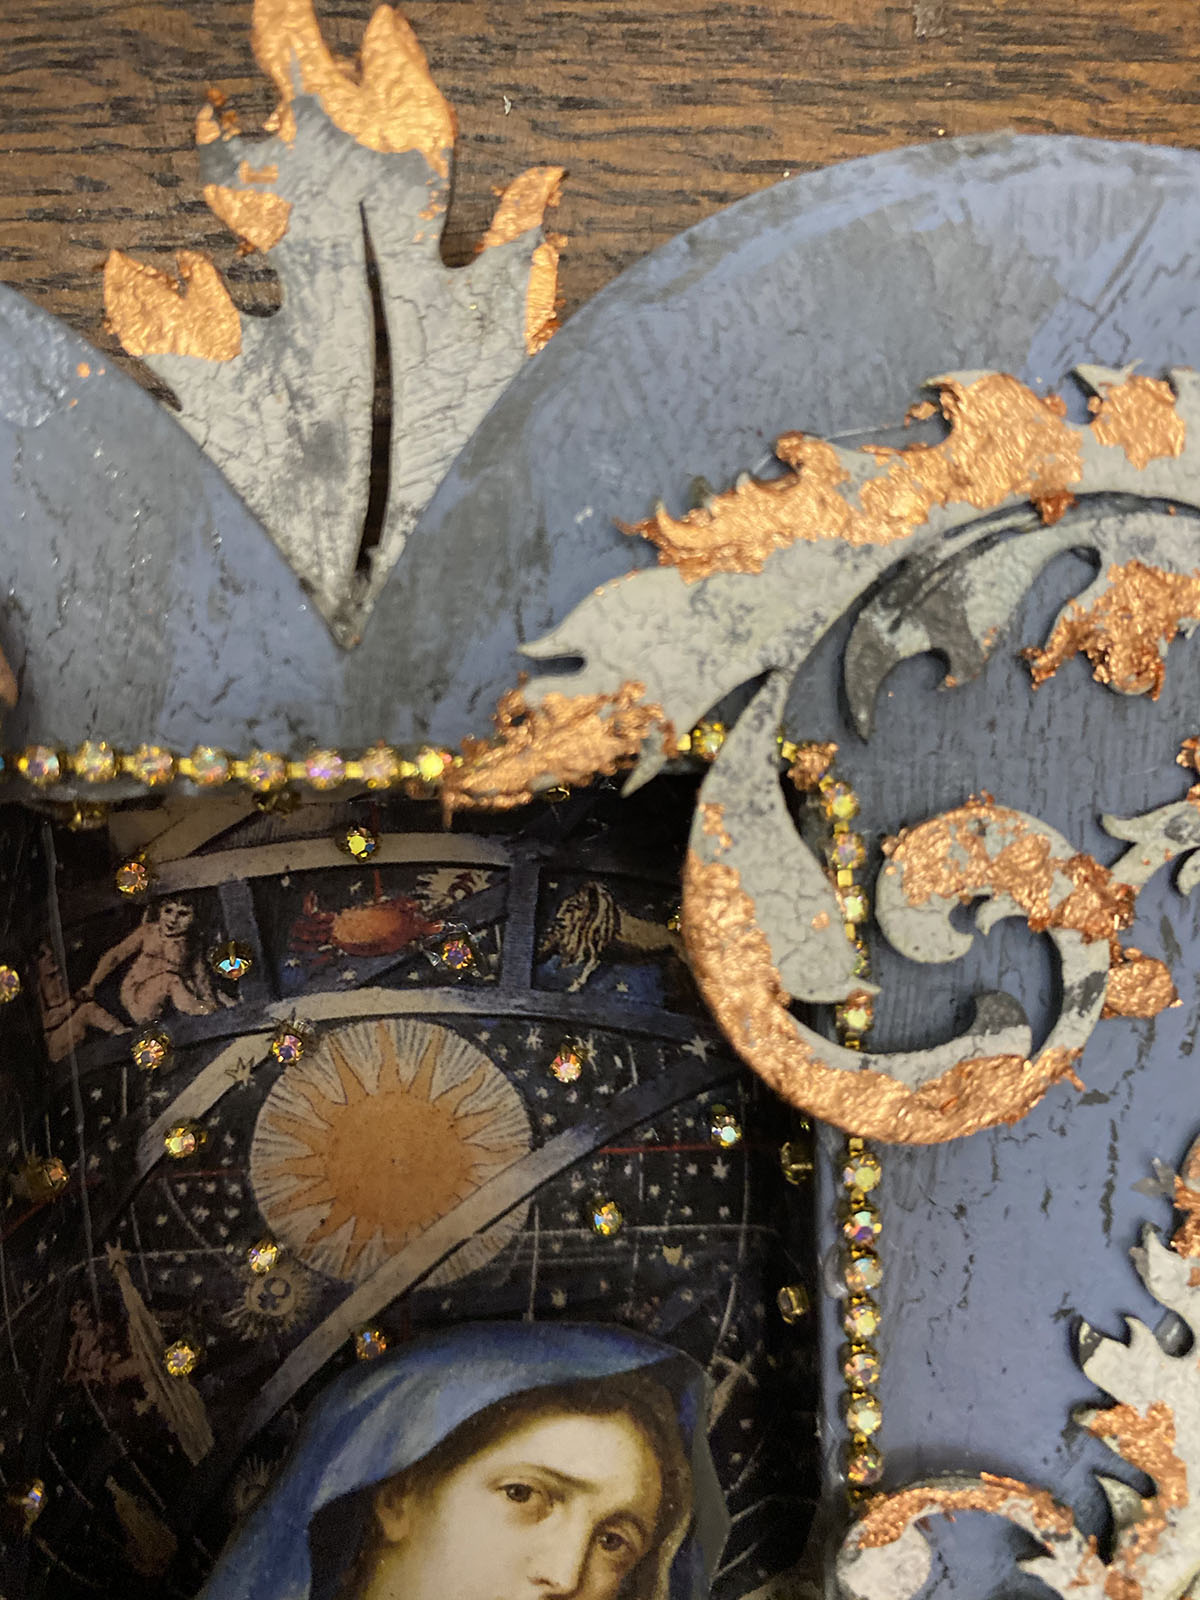
Mother Mary in front of her heavens, looking down at the Earth thinking, "C'mon people...W.T.F.?" 

So I sat down and went to work. Obviously making art trumps (euw that pun was not intended) organizing and cleaning, amiright?! This is why I can never get my space organized. I find something I've either forgotten about or have been looking for to finish up a project with, find it, drop everything and start messing with whatever I've excavated. 

Organizing is out the door, I end up creating more mess and it looks like a family of hoarders lives in my studio space! You see how my mind is a steel trap?


As far as techniques go if you can cut, paint, and glue - then you can make this!

Quick notes on what I did:

Painted outside of shrine a dark charcoal.  Then decided eh. I want the outside blue but oooh what if it was gray and the blue showed through? Out came the blue paint over the to cover up the charcoal. Applied Crackle, impatiently waited for it to get tacky, decided to speed up drying with the glue gun. After it was tacky enough I used my most favorite Golden Paint Micaceous Iron Oxide. Well that didn't work out to well, so I ended up adding another coat of Crackle. Applied a pale blue over the crackled Micaceous Iron Oxide and it obeyed my wishes.


Glued in the background image into the niche, covered the entire image in Diamond Glaze. Waited 10-15 minutes for the bubbles to appear, popped them and then let it dry overnight on a flat surface. Once it was dry, I attached the rhinestone chain around the niche opening.

The Featherly Flourishes were painted dark charcoal and crackled with a plain white paint. Copper leafing applied here and there on the flourishes once they were dry, then I just glued them down with the glue gun.


The image of Mary is glued down behind the rhinestone chain, at the very edge of the niche opening.

The Stars:  I cut each link off the rhinestone chain, pick up with a tweezer, attach a tiny bit of hot glue to the bottom and glued them randomly on inside of niche.

Tiny Paper Roses with a couple of Calla Lilies and that's it,  you're all done!


Wednesday, September 9, 2020

Flying the Coop Part 1


Alpha Stamps has a really cute Mushroom House Kit that I used to make this little tchotski from. I think it would look really cute in between a row of books, don't you? 

"Flying the Coop" came through working the piece, perhaps even a Fraudian slip. (My oldest moved out on her own and my middle child is off to college at UAB.) One more left to go!  OK we all know I have to take to my bed each time one abandons leaves me!


Mr. Alfie Ferret-Bueller: 
 Head Attention Seeker at Mockingbird Manor
                                                         
I want to focus on how I made the house 3-D, since the kit comes with 2 separate mushroom shapes. Before I start, I am thinking I MUST have mentioned this in some of my past blog posts, but here it is anyways.

Never ever throw away the chipboard that backs the papers ordered from Alpha Stamps, it is great to have on hand for miniature and mixed media work.

To start: first assemble the niche and glue to mushroom. Using a piece of chipboard (hopefully from your Alpha Stamps
package!) eyeball the width you'll want your house and cut long strips. For this house the niche added a big enough gap to allow the house to stand on its own.

Yes, yes I know, actual measurements would be nice but I am the absolute worse at measurements. My measurement faux pas are quite legendary at Alpha Stamps (me, bowing this way and that way, waving to Leslie).

Apply glue to the edges to both mushroom top shapes. Using a strip of chipboard glue it to the top part to where it meets the stem.

Hot glue vs. Aileens: Wasn't going to burn my fingerprints off trying

to adjust with the hot glue, so Aileens it was. Yes it was a pain in the butt, but alas! I wanted to keep my fingerprints.


Do the same with the lower half on each side, and a piece on the bottom, let dry.

Once dry cover the mushroom house with paper, paint it, or however

you'd like to cover it. Note: If you are going to keep the door that is semi attached to the mushroom front, hinge tape works great to keep it attached to the mushroom base.

Part 2 on Sunday 9/13 - How to get the stone effect on the shroom abode!


Saturday, August 8, 2020

Forever Nanny

 Forever your nanny, I shall be!

 A little cool, a little creepy, eh?

Had a lot of fun playing with the Little Niche Shrine - Simple Heart from Alpha Stamps. Leslie asked me to put something together using the fabulous Chipboard Wings Assortment and the Simple Heart shrine so I was all ready to do something with them!

At least I thought I was. Every time I sat down to work on it I drew a blank and it got pushed off to the side. The other day I was going through one of the many piles I have everywhere in my studio and found the Articulated Skeleton - 4 Inch Tall a long with an image from the Dolls in the Attic Collage Sheet laying together. Who knows how long they had been in this pile, I'm just glad they showed up when they did. (Added bonus - the image was already cut out!)

Throw in finding that I had two pairs of the Ruby Red Slippers, and just like that everything fell together. I love it when it things just fall into place and I can get things done!

Pardon my paperclay encrusted hands.

The Simple Heart Shrine has a niche but I wanted something a little more 3D so instead of using it, I inserted one of the facades from the Matchbox Shrine Facade Set. Of course it was inserted after everything else was finished but that's the quick info.


Process:

Cover the heart with Red Suede Paper, flip it over and trace the opening. With a craft knife or really sharp scissors cut out the area you just traced. Save that piece as you'll be able to use it to line the inside of the matchbox that the facade sits atop of. 

Edge the outside of the heart with black ink. My favorite stamp pad to use is the Versafine Pigment Ink Pad in black. 

Paint / decoupage / distress the outside of the facade. 

Glue facade to an empty matchbox, then line the matchbox with the Red Suede Paper and set aside.

Take out the skeleton pieces and sort of paint them haphazardly, you don't want a solid white. After all, real bones are not all one solid color (don't ask how I know, really.) In the picture below the legs hadn't been painted yet as the glue was still drying.


Glue the arm pieces together, after you figure out how you want the limbs positioned. I changed my mind on the positioning of the arm but thankfully the glue hadn't dried and the change was possible. 

Glue head and torso to the back of your image so that both will fit in the niche space, set aside.

Once everything is dried, then hot glue the legs to the bottom of the niche so that the feet are facing forward.

No reason for this photo except that the legs in the shoes crack me up!


Accordion folded crepe paper makes the skirt, that is just glued on with hot glue. Once the legs are glued onto the niche and the skirt, then place the image with skelly onto the skirt and glue down the legs to the sides of the niche. I used Aileen's Tacky Glue for this. No need to glue the image to the skirt, the legs being glued holds everything together. Add the Patina Filigree Heart Charm and the Verdigris Bronze Diamond Filigree and set aside the niche.

The wings are painted white, and then rubber stamped with a floral / swirly print. I hit the wings with the heat gun to dry the ink after I smudged part of it (thinking it was already dry). 

Glue the wings to the back of the shrine, then glue the shrine into the opening on the heart. 

That's it! Your're done. Attach a hanger to the back for hanging, but I think I am going to use mine on a book cover.  How will you display yours?


Dreadfully Delusional Dolls - Ms. Marwood

  Ms. Eunice Amelia Marwood Loves to walk under the darkness of New Moons. Lives off Veuve Clicquot, cavier and cigarrettes. Collects antiqu...

Popular Posts